
How to Flush DNS Cache on Windows, Mac, Linux and Chrome?
Last Updated: Nov 10, 2026
Table of content:
- What is DNS Cache?
- Why Should You Flush Your DNS Cache?
- Why Do You Need to Flush DNS Cache Periodically?
- How to Flush DNS Cache on Windows?
- How to Flush DNS Cache on Mac?
- How to Flush DNS Cache on Linux?
- How to Check Which DNS Service Linux Uses?
- How to Flush DNS Cache in Google Chrome?
- Windows vs. Mac vs. Linux vs. Chrome: Quick Comparison
- Conclusion
- FAQs
Does it ever happen that you open a website but it’s not loading or it is showing an outdated version? Sometimes it redirects you to the wrong IP address as well. You may be asking yourself why this is happening. So these types of problems occur when there are DNS cache issues.
You can solve such problems by flushing the DNS cache which is a simple troubleshooting method. Flushing the DNS cache helps you resolve website loading issues, outdated DNS records and certain network connectivity issues.
As you already know, computers use DNS to connect to websites. It takes some time for a device to know the IP address and connect to a website. To speed up browsing, the operating system and web browser save DNS lookup results in the cache.
But these cache records can cause connectivity issues or become outdated. To save you from such issues, we are going to explain how to flush the DNS cache on Windows, macOS, Linux and Google Chrome using simple methods.
We will give you step by step instructions so you can understand accurately. First we will learn about the DNS cache and then we will move forward.
What is DNS Cache?
DNS cache is a temporary local database on your server, browser or device. It stores domain names and their corresponding IP addresses.
When you type a website name, for example, youtube.com your device will request its IP address from the DNS server and store the information in the form of a cache.
Now you visit the same website for the second time. The operating system will not request the DNS server again. It will use the cached information to connect to the website quickly.
DNS caching improves browsing performance. But outdated or incorrect records can sometimes prevent websites from loading properly. Flushing the DNS cache removes locally cached DNS entries. So new lookups can retrieve updated information.
Why Should You Flush Your DNS Cache?
When you flush your DNS, it helps you in various circumstances. These include:
A website fails to open because the device has an outdated DNS record.
DNS changes are not taking effect at all and your device continues to use older cached results.
Encounter DNS errors like ‘DNS server not responding’.
You are experiencing website redirection issues
You are troubleshooting network issues
Before troubleshooting further, you can check the DNS server your device is using to identify the resolver handling your DNS requests. Meanwhile, always keep in mind that flushing your DNS will not fix every network issue. If you are getting issues from your internet service provider, DNS server, firewall or website server. You will require further troubleshooting.
Why Do You Need to Flush DNS Cache Periodically?
You also need to flush the DNS cache periodically to prevent surge behaviour tracking and storing DNS records. This makes it easy for hackers to predict your browser history.
DNS cache management and DNS leak protection are different aspects of DNS security. If you use a VPN, you should verify that the intended resolver is handling your DNS requests. You can also check for potential DNS leaks to find out if your DNS requests are reaching an unexpected DNS server.
To solve technical problems, forcing the operating system to search for updated DNS records can solve connection issues and incorrectly displayed web content. Now let's move forward to learn how to flush your DNS cache depending on your operating system.
How to Flush DNS Cache on Windows?
Windows provides a built in command. This allows you to clear the DNS resolver cache in just a few seconds. This method works the same way on both Windows versions.
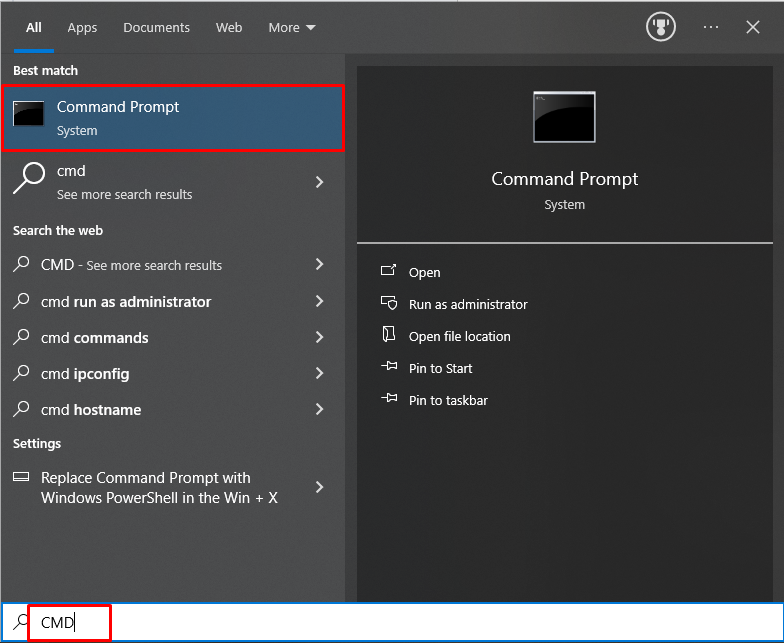
Click the search menu or click Windows + R. Type cmd or Command Prompt.
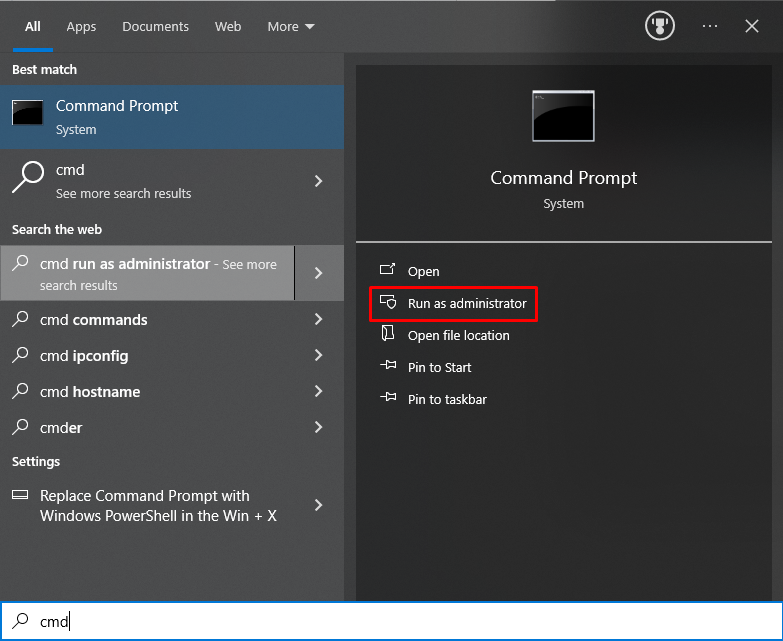
Click Run as administrator. Click Yes if the User Account Control prompt appears.
Run the command below in the CMD window:
ipconfig /flushdns
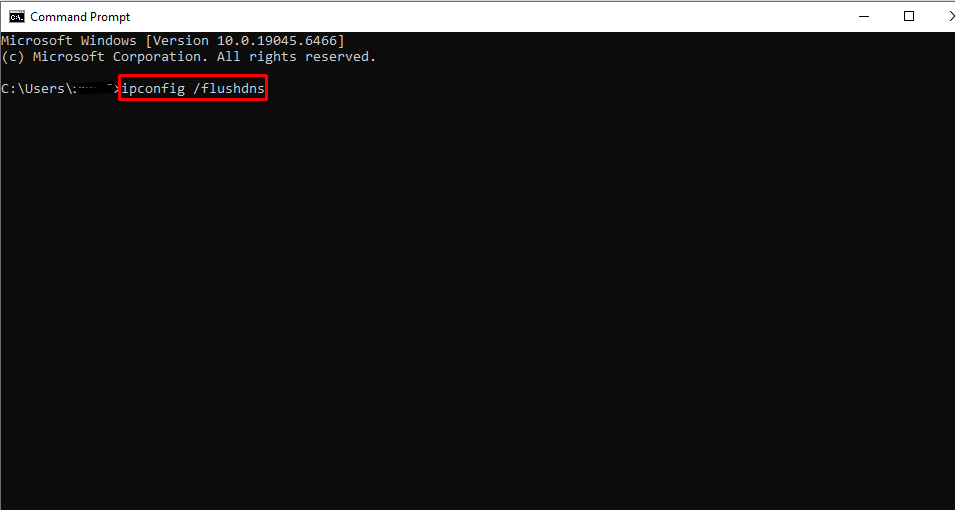
Now press Enter.
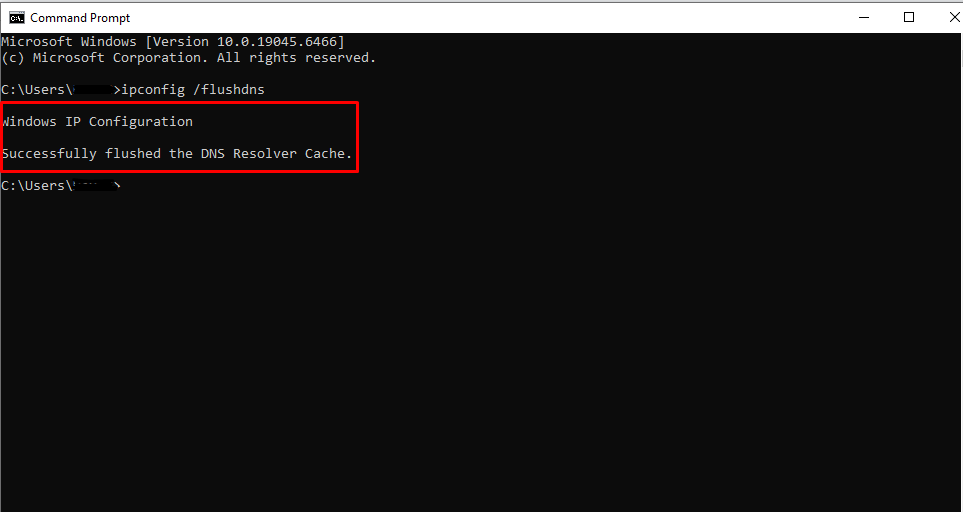
If the function is successful, you will see a confirmation message which will be:
Successfully flushed the DNS Resolver Cache.
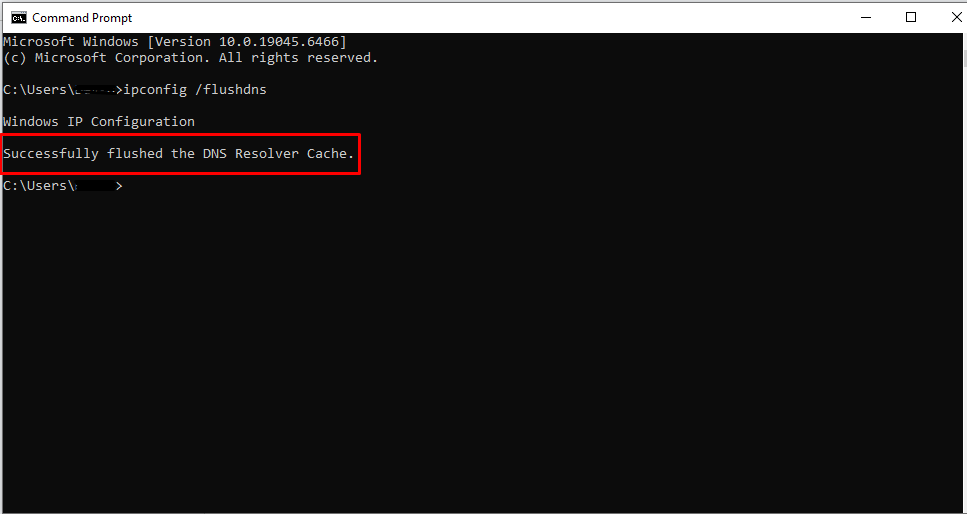
Your Windows DNS resolver cache has now been cleared.
Close and reopen your browser. Revisit the website in which you were having problems. If the issue continues to bother you, close and reopen your browser or make sure your internet is working.
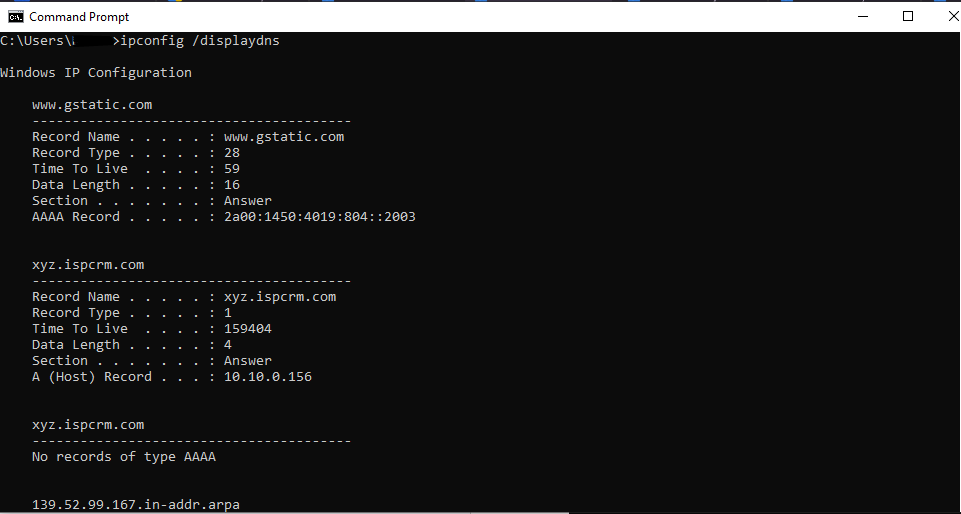
If you want to analyze the current DNS cache before flushing it. Open the Command Prompt. Then run ipconfig /displaydns.
How to Flush DNS Cache on Mac?
macOS caches DNS information to improve browsing performance. But the command which you can use to clear the cache depends on the macOS version.
Step 1: Open Terminal
You can open Terminal using the following methods:
Open Finder and go to Applications. Select Utilities and open Terminal.
Press Command + Space to run Spotlight Search, type Terminal and press Enter.
Step 2: Run the Proper Command
For modern macOS versions (including macOS Ventura, Sonoma, Sequoia and Tahoe), use the following command:
sudo dscacheutil -flushcache; sudo killall -HUP mDNSResponder
Press Enter to run the command.
Step 3: Enter Your Password
Enter your Mac administrator password and press Enter. The terminal doesn’t display your password while you type. Simply enter it and press Enter.
The command clears the directory service cache. It signals Apple’s DNS responder to refresh its cached information.
Step 4: Confirm the Cache Clearance
The command can complete without showing you a success message. This behaviour is also normal. You can reopen your browser and test the website again afterwards.
When operating on older macOS versions, DNS cache commands will differ. If you are using an older version of macOS, you need to check Apple’s documentation. Afterwards use a command which is appropriate to that release.
How to Flush DNS Cache on Linux?
Linux distributions handle DNS caching differently. Some use systemd-resolved. Others use NetworkManager, nscd, dnsmasq or another DNS caching service. So the correct method depends on your system configuration.
Method 1:
The first method is to flush the DNS cache using systemd resolved. For Linux distributions that use the systemd-resolved service, you need to follow the given steps to flush the DNS cache
Open a terminal.
Run the following command:
sudo resolvectl flush-caches
Enter your password if requested.
The command clears the DNS cache which systemd-resolved maintains.
On older systems, you can also encounter this command:
sudo systemd-resolve --flush-caches
However resolvectl has replaced systemd resolved on many newer distributions.
Method 2:
The second method is about restarting the nscd service. If your system uses the Name Service Cache Daemon (nscd), you can clear its cache by restarting the service:
sudo systemctl restart nscd
This restarts the service and clears its in memory caches. But be cautious as it can affect name-resolution requests a little bit. If the service is not installed or running, this command will not work.
Method 3:
Restart the dnsmasq Service
Some Linux systems use dnsmasq to cache DNS responses. If that service is responsible for DNS caching on your system, run:
sudo systemctl restart dnsmasq
This restarts the service and clears its cached DNS entries. However it can temporarily interrupt DNS resolution for devices or applications relying on it.
How to Check Which DNS Service Linux Uses?
If you are not sure about the running DNS service, you can try the following:
systemctl is-active systemd-resolved
You can also check for nscd or dnsmasq:
systemctl is-active nscd (for nscd)
systemctl is-active dnsmasq (for dnsmasq)
These commands help identify active services. Keep in mind that your distribution can use a different DNS configuration as well.
Don’t run every Linux command randomly. First of all find the DNS caching service. Then you can use the appropriate method for your distribution afterwards.
How to Flush DNS Cache in Google Chrome?
You must know that Google has its own internal DNS cache and if you don’t flush the DNS cache, you will not be able to access Google. To flush your DNS cache in Google Chrome, you can use the internal network settings page.
You need to follow some steps to flush the DNS cache in Google Chrome. These steps are as follows:
Open Chrome on your system.
Type or paste chrome://net-internals/#dns in the address bar.
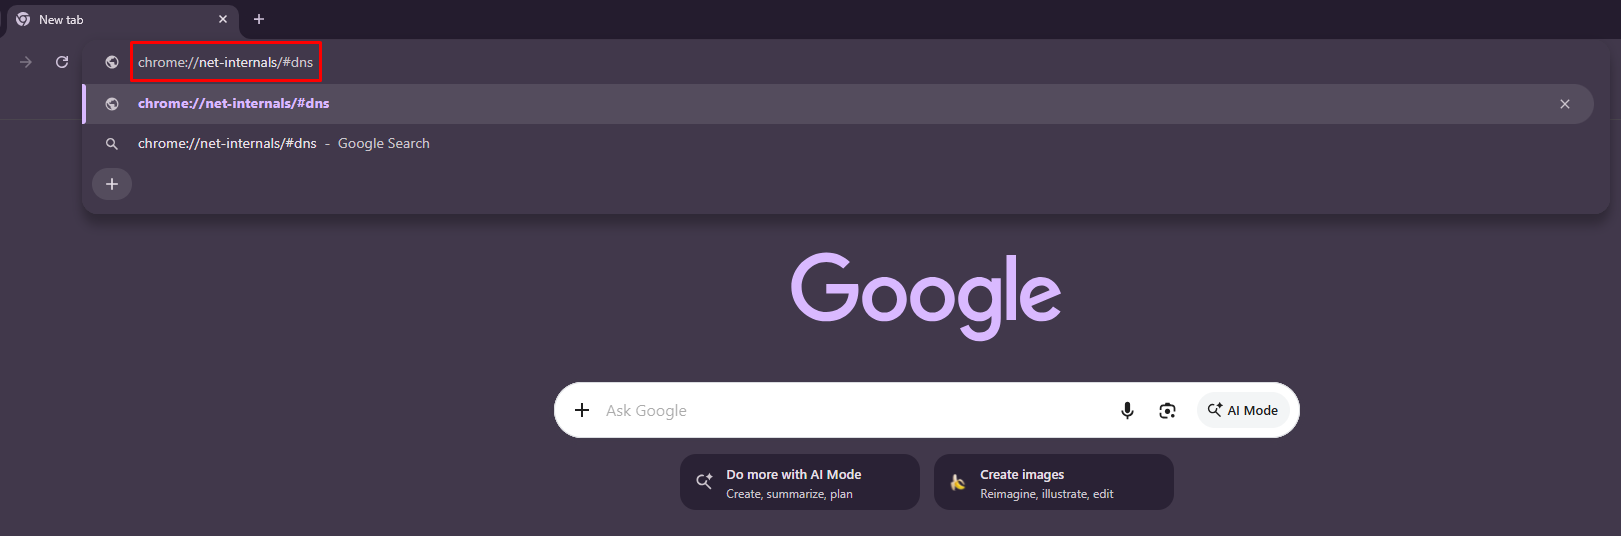
Press Enter and it will open a page.
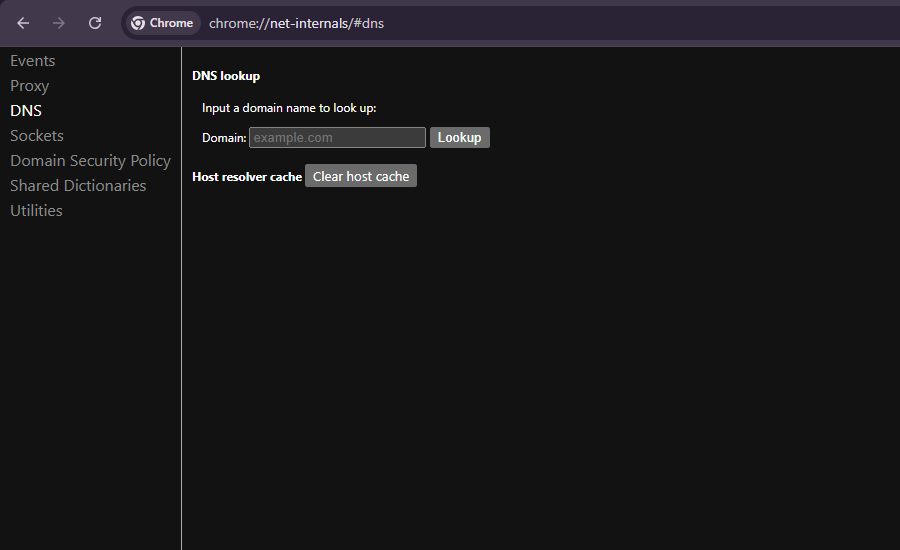
You can see the ‘Clear host cache’ button.
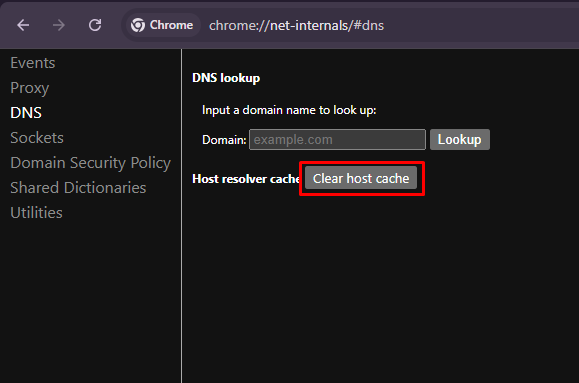
Click on this button and restart Chrome.
There is an optional step. This step will help you close all the active and open connections between Google Chrome and the servers of the website the user visits. For this, type or paste chrome://net-internals/#sockets in the address bar of Google Chrome.
You will see the following:
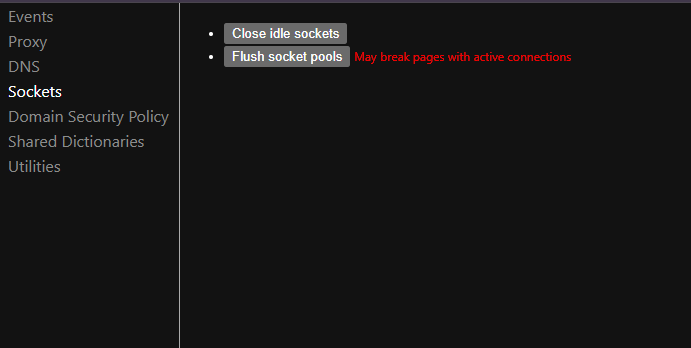
Now click on Flush socket pools to clear all active connections. Afterwards close all the tabs and restart Google Chrome.
If you can’t find any such buttons and options, you can open Incognito mode. Restart your operating system. Afterwards follow the above steps to flush the DNS cache from the operating system.
Windows vs. Mac vs. Linux vs. Chrome: Quick Comparison
A quick comparison between Windows/Mac/Linux/Google Chrome is given:
Platform | Method or Command | Requirement |
Windows 10/11 | Ipconfig /flushdns | Administrative command prompt recommended |
macOS | sudo dscacheutil -flushcache; sudo killall -HUP mDNSResponder | Administrator password |
Linux with systemd-resolved | sudo resolvectl flush-caches | Sudo privileges |
Linux with nscd | sudo systemctl restart nscd | Sudo privileges; service must be available |
Linux with dnsmasq | sudo systemctl restart dnsmasq | Sudo privileges; service must be available |
Google Chrome | chrome://net-internals/#dns | Chrome browser access |
Conclusion
Flushing the DNS cache is a simple and straightforward troubleshooting method. It helps to solve some specific website loading and name resolution issues. When you are using Windows, you use ipconfig /flushdns.
On macOS, you can run the appropriate Terminal command. On Linux, you should identify your active DNS caching service before clearing its cache. Google Chrome also provides an internal page for clearing its host cache.
If you see outdated DNS records or a website that refuses to load. Try the relevant method for your device. If the problem continues, investigate your DNS settings, browser connections, router or internet service to identify the underlying cause.
Besides this, you can also test DNS server response times to compare different DNS providers and identify a potentially faster resolver for your network.
FAQs
Does flushing DNS cache delete browsing history?
No. Flushing the DNS cache doesn’t delete your browsing history, saved passwords, cookies, bookmarks or downloaded files.
It only clears DNS information stored by the relevant operating system or application. Your device will perform new DNS lookups when you revisit websites and new entries will gradually be cached.
However, clearing the DNS cache alone doesn’t guarantee complete privacy. This is because DNS requests can still be visible to your network operator or DNS provider. It depends on your network and DNS configuration.
Can flushing the DNS cache impact internet speed?
No. Flushing the DNS cache doesn’t increase your internet speed or speed up your normal browsing. However if your page loads slowly, it will be due to outdated or corrupted records.
How often should you flush the DNS Cache?
You generally don’t need to flush your DNS cache regularly. Operating systems and browsers manage DNS entries automatically, including their expiration. You should consider flushing the cache when:
A website recently changed its IP address.
You have changed your DNS server settings.
A website works on another device but not on your operating system.
You are troubleshooting DNS related connection errors.
If your internet connection works normally, there is usually no reason to clear the cache.
What to do if flushing DNS does not work?
Try the following troubleshooting steps if you flushed the DNS cache but can’t access the website.
Restart your browser
Restart your computer
Restart your router
Check your DNS settings
Try another DNS server
Check the website's status
Also analyze other network errors like firewall restrictions, proxy settings or general internet connectivity issues.
Remember that flushing DNS only clears cached name resolution information. It will not repair a faulty internet connection or force every DNS server around the world to update immediately.
Can I flush the DNS cache directly from my internet service provider’s portal?
Usually, no. Most internet service provider (ISP) portals don’t offer a direct option to flush the DNS cache. It depends on your ISP and the router or DNS service they provide.
There are several different DNS caches. The way you clear them depends on where the cached information is stored. We have already explained flushing the DNS cache on various operating systems and in Google Chrome.