
How to Fix Slow DNS Lookup

Last Updated: Jun 23, 2026
DNS is one of the major factors in the operation of the Internet. DNS determines the quality of the end-user experience. Slow DNS leads to bad customer/reader satisfaction, which makes them leave your web page without fully loading it; basically, you are losing users and traffic.
Loading a site slowly annoys visitors to your webpage, which affects how well your brand is performing. For an enterprise site, this has an effect on its image as a whole.
Optimizing DNS resolution time is very crucial for online services. A minor decrease in resolution time causes a rise of drop-off rate as well and decreases sales conversion-rate.
This article is going to help with fast DNS resolution as well provide some suggestions for improving your site’s speed. You will know possible factors for slow DNS lookup and complete solution to fast DNS time.
What is DNS Lookup Time?
A DNS server is a domain name server that your computer's web browser uses to find a particular website/domain address. Your pc doesn’t understand how it should find out where this site is located by typing only the website name. It needs the server's IP address that hosts the website or application.
DNS lookup is the process in which DNS goes through the IP address of a given domain and returns it to your local computer. With this IP address, your computer builds a connection with the hosting server for sending and receiving data.
In short, DNS lookup time is the time DNS takes to receive a request for the domain IP address and return the IP address to your browser. Then your browser loads the website content.
Resolution time determines how quickly or slowly your website loads. To find out how good or bad the user experience will be.
What is Good DNS Lookup Time?
Famous DNS resolution time is 50ms. This is universally accepted for good DNS time, it does not affect website visitors. They don't even notice this time.
Any number between 50ms and 120ms is acceptable and good. Above 120ms DNS time starts to feel slow, and above 150ms clearly hurts performance.
Possible Factors for Slow DNS
DNS latency typically occurs due to these possible reasons.
Slow DNS providers
Usually, computers use ISPs or hosting providers by default. These servers are not built for speed. The old server has a higher response time, which slows down quick domain name resolution compared to faster public DNS.
Too Many DNS Records
When a domain resolution has various DNS records, it is necessary to find the correct one. It takes longer because the system has to process more data when the records are not clearly organised.
Inefficient DNS caching
DNS caching speeds up repeated lookups by storing previous results. Unclear cache or improperly configured DNS caching also delays DNS lookup times.
Excessive DNS chaining
When a required domain address requires multiple redirects to reach the final result, it causes a delay. Each step adds a small delay. A longer chain slows down the process.
Geographical Distance
One of other reasons that cause your DNS to be very slow could possibly be because it’s located too far away from you. More time is taken for a DNS server to reply to a query or request. That causes the delay.
Overloaded Nameservers
The response of DNS servers slows down when dealing with too many requests at the same time.
Overwhelming amounts of network congestion requests from users is also a reason for slow DNS response. During heavy load, server response time is very low and it leads to further delay.
How to check DNS lookup Time?
There are two ways to find the DNS speed with online tool and with manual CLI commands
Using Fastest DNS online Tool
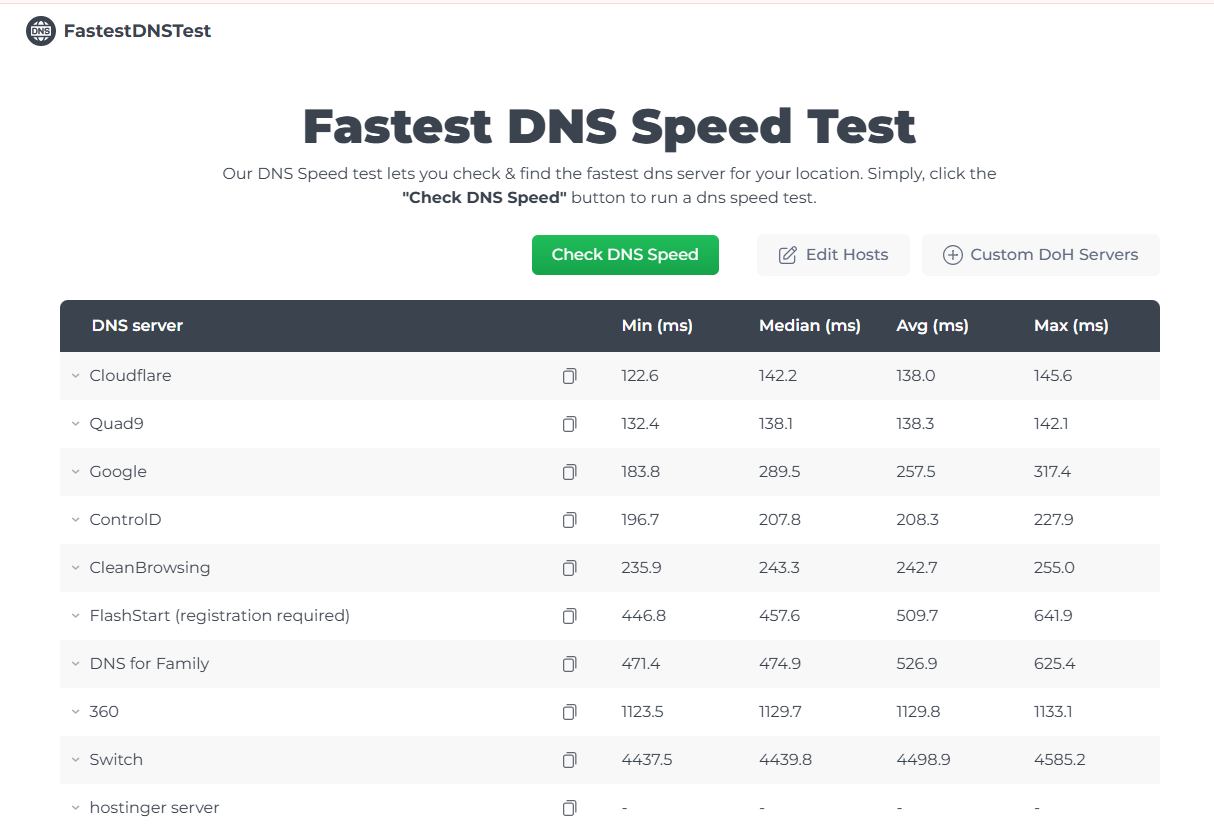
To find a reliable DNS server, use our Fastest DNS speed test, which tests all DNS resolution times. Click on the DNS test speed button. For each DNS service, the resolution time is shown. So, you can select the fastest one.
Through Manual Checking
These are CLI commands for Linux/Mac
For Linux/Mac
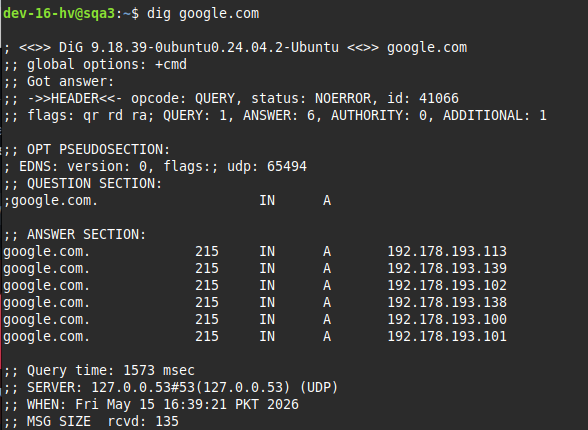
On linux or Mac Operating system, dig command is used to show DNS query time in milliseconds:
Open CLI command interface
Write dig google.com
The command display Query time; Query time: 24msec
To find DNS lookup time for particular server first find their IP address
Type in CLI
dig @1.1.1.1 google.com
dig @8.8.8.8 google.com
dig @9.9.9.9 google.com
For Windows
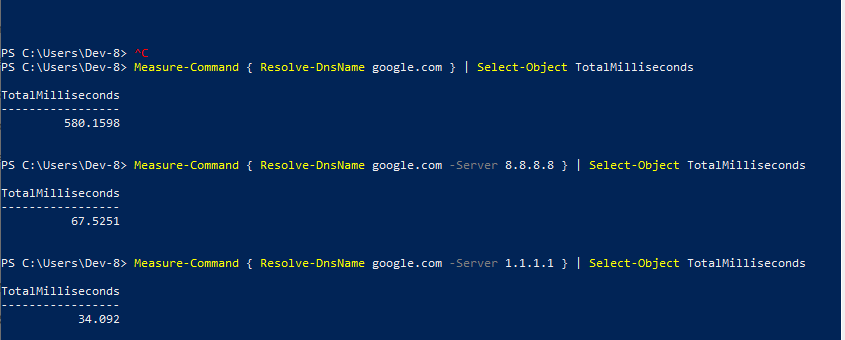
To find DNS lookup time, open windows powershell. Type the following commands
Overall lookup time
Measure-Command { Resolve-DnsName google.com } | Select-Object TotalMilliseconds
Particular DNS
Measure-Command { Resolve-DnsName google.com -Server 1.1.1.1 } | Select-Object TotalMilliseconds
Best Practice:
Run each dig command 3 to 5 times and then consider the average result. Starting queries are slower but further queries show the true server performance.
Methods to fix slow DNS Lookup
These are some methods that fix slow DNS lookup, providing you with fast-loading webpages.
1- Switch to Faster DNS Server
Most ISPs' provided DNS servers are slower. Switch to a faster and more reliable DNS provider. This is one of the best fixes to speedup the DNS server. Some well-known DNS providers are
Websoul DNS: A regional provider option for local and global users (103.21.124.204, 103.21.124.205)
Cloudflare DNS: Well-known for its speed and security (1.1.1.1 , 1.0.0.1)
Google Public DNS is a reliable choice for users seeking both speed and security in DNS resolution. (8.8.8.8 , 8.8.4.4 )
Amazon Route 53: A DNS service that can handle a huge traffic load and reduce DNS resolution time (no specific IP)
Change DNS setting in Windows
Steps to follow
Open Settings → Network & Internet → Advanced network settings
Click your active connection( Wifi or Ethernet )→ Hardware properties
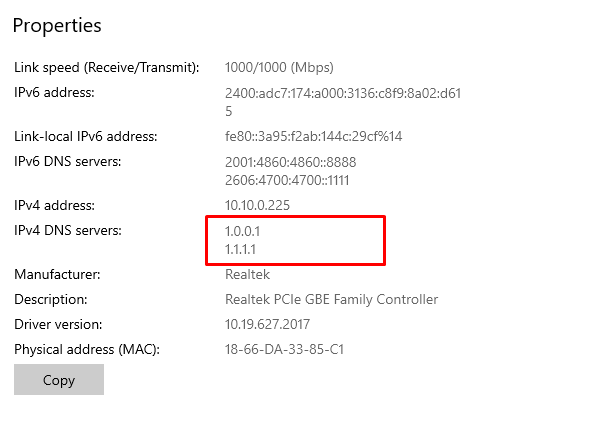
Click on IP address
Switch from Automatic to Manual → enable IPv4
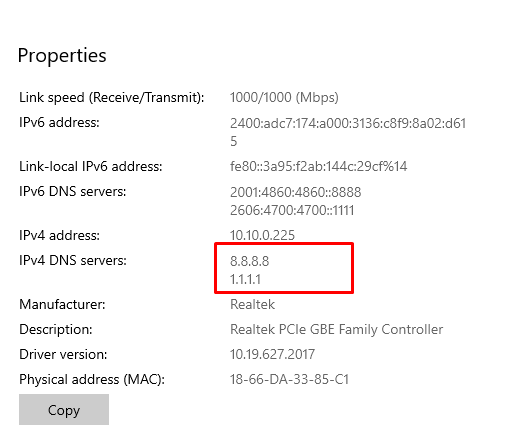
Set Preferred DNS to 8.8.8.8 and Alternate DNS to 1.0.0.1
Click Save and test with PowerShell nslookup command

You can also verify the DNS server has changed now
Change DNS setting on MAC OS
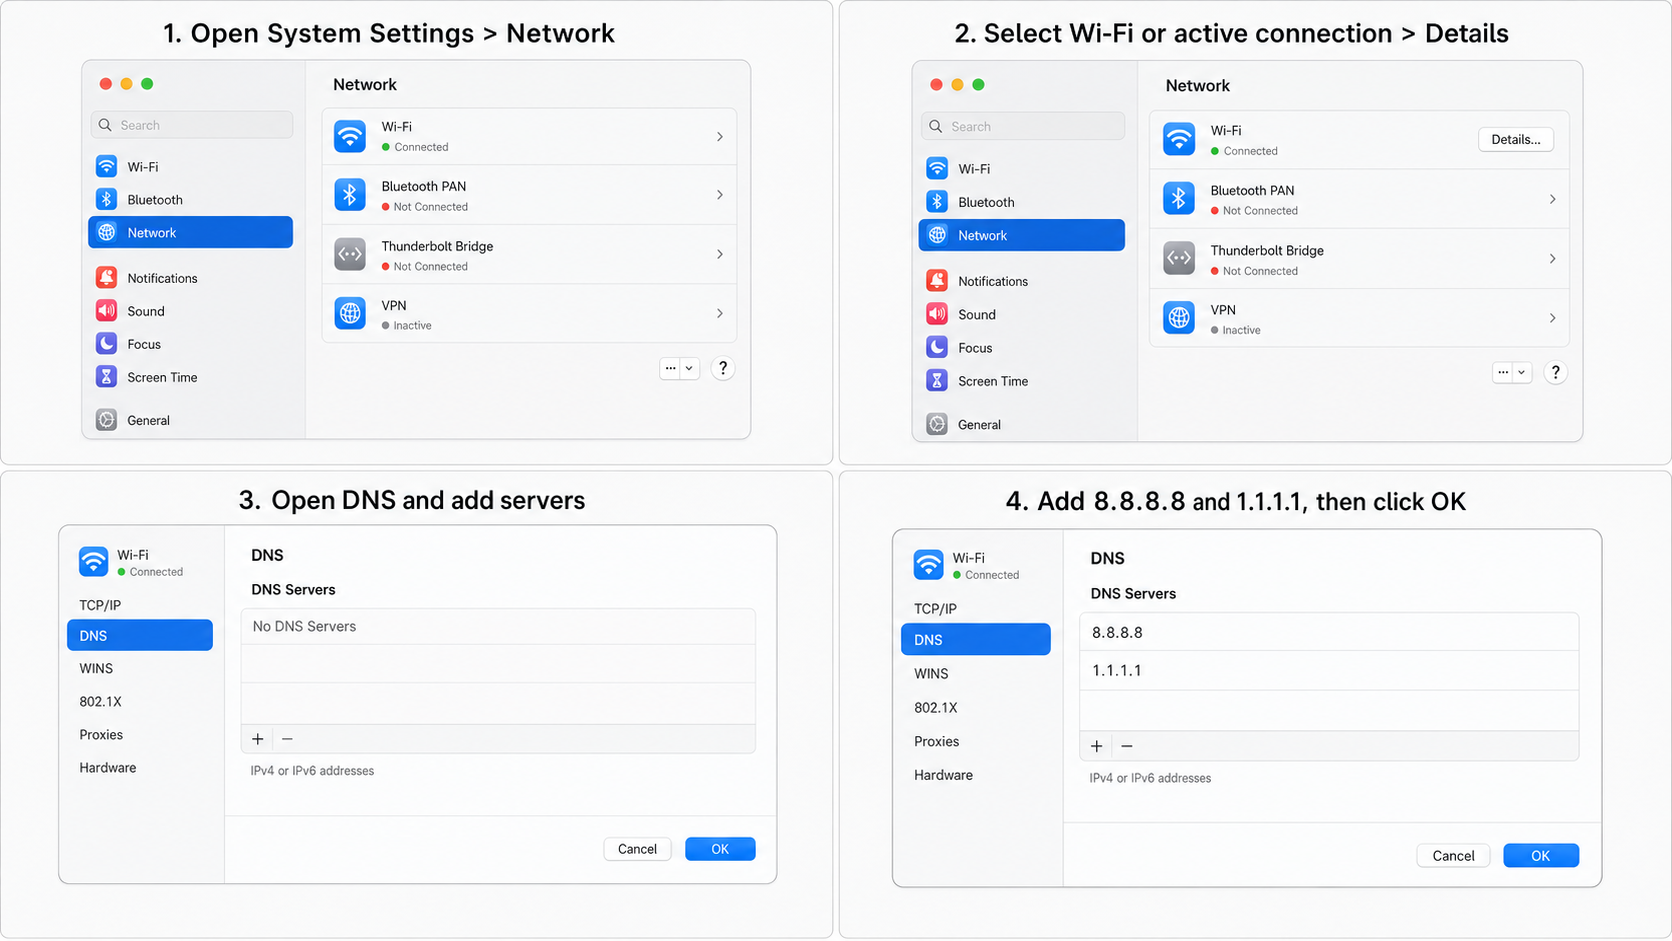
Step to Follow
Open System Settings → Network → Wi-Fi (or your active connection)
Click Details next to your connected network
Click DNS in the sidebar
Remove existing entries and add 8.8.8.8 and 1.0.0.1
Click OK then Apply
Change DNS on Linux
Steps to Follow
Edit the resolved config
sudo nano /etc/systemd/resolved.conf
Add or modify these lines
[Resolve]
DNS=8.8.8.8 (preferred DNS address)
FallbackDNS=1.1.1.1 (Alternate DNS address)
Restart the service
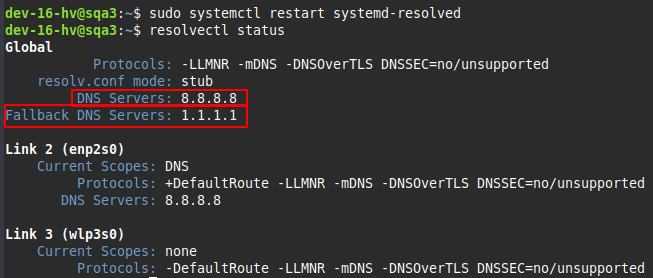
sudo systemctl restart systemd-resolved
Verify the change
resolvectl status
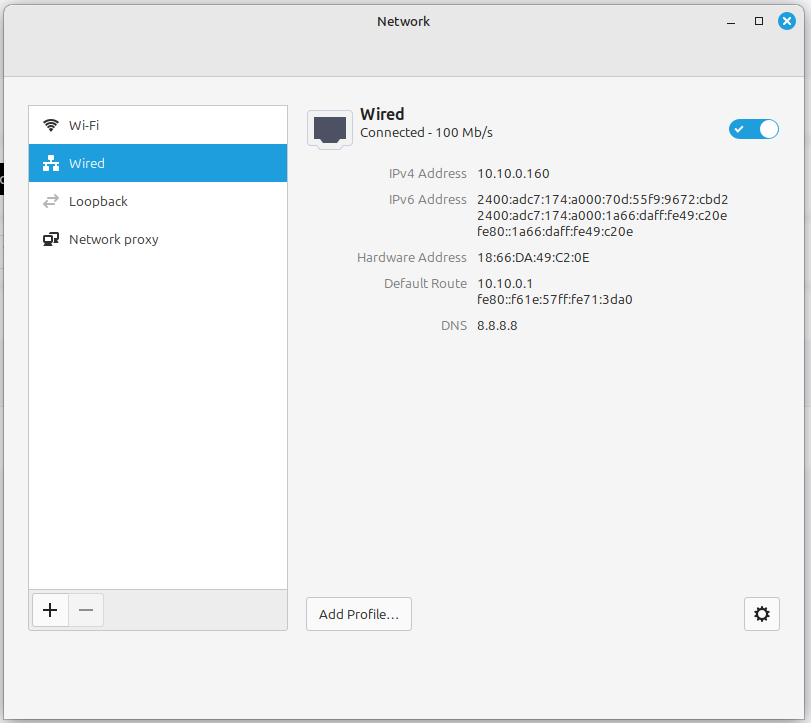
To verify the DNS server is changed or not, go to network setting→ wired
Here, you can see the current DNS server running on your system.
2- Simplify DNS Records & Clear Stale Cache
Having too much data for a domain name server may be slowing things up, you know. A site’s invalid cache and stale dns entries may cause slow DNS lookups.This makes it more complicated to resolve this issue.
Periodically review DNS records and delete unused dns entries from time to time. Remove outdated or duplicate records (old A, CNAME, and TXT entries).
Simplify DNS structure by avoiding unnecessary DNS records. A single DNS query adds overhead to the system. Excessive CNAME redirects cause delays. Point your domain directly to the final IP address.
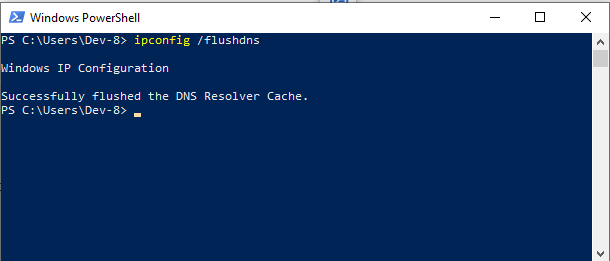
Windows in PowerShell
# Windows (Command Prompt as Administrator)
ipconfig /flushdns
MacOS
sudo dscacheutil -flushcache; sudo killall -HUP mDNSResponder
Linux
sudo resolvectl flush-caches
3-Enable DNS Caching
Activate the DNS cache feature on this computer, which retains information about website IP addresses temporarily. That will make it easier to find the same website next time. The DNS lookup will work faster because it already has IP addresses in cache.
DNS caching features are typically enabled in all modern browsers. Set up caching of DNS requests on your machine so that it does not need a lookup every time when querying an existing website name. It will help with faster DNS lookup..
Setting Prefetch DNS (Chrome)
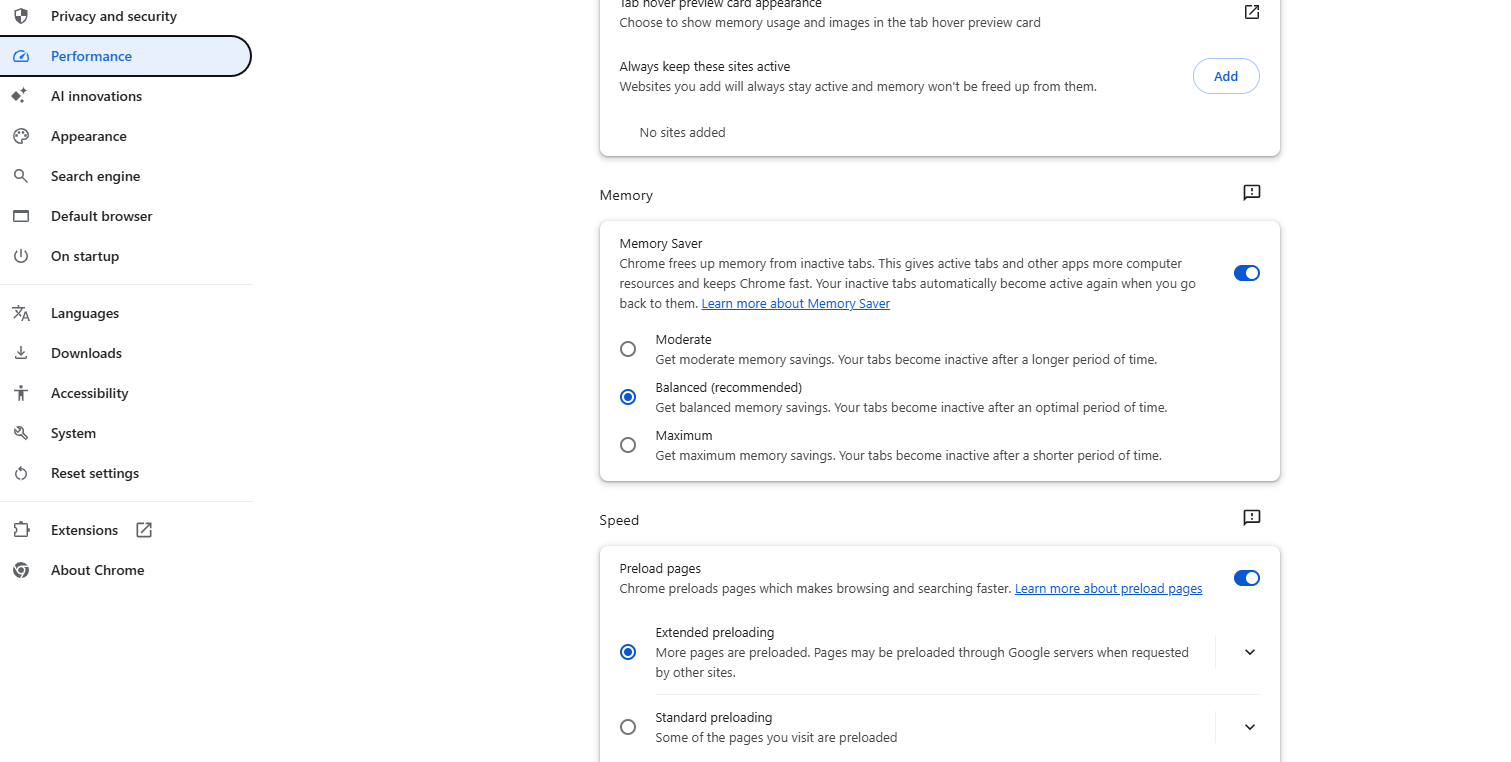
In chrome, make sure, Preload pages are enabled in the browser. If it is not then enable it.
Open Chrome → Settings → Performance→Speed→Preload pages
Enable "Preload pages for faster browsing and searching"
This enables DNS prefetching.
Setting Prefetch DNS ( FireFox)
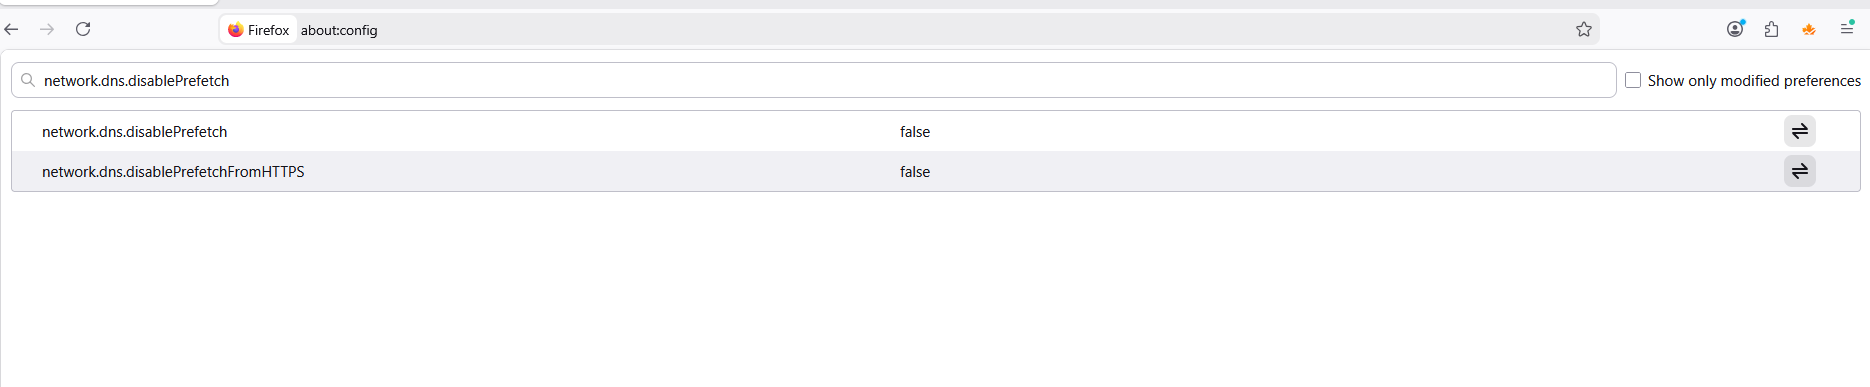
In Firefox, prefetching is controlled by network.dns.disablePrefetch. When it is set to false, DNS prefetching is ON (enabled). To check:
Type about:config in the address bar and press Enter
Search for network.dns.disablePrefetch
Ensure it is set to false
Also check network.dns.disablePrefetchFromHTTPS — set to false for HTTPS sites too
Setting Prefetch DNS (Microsoft Edge)
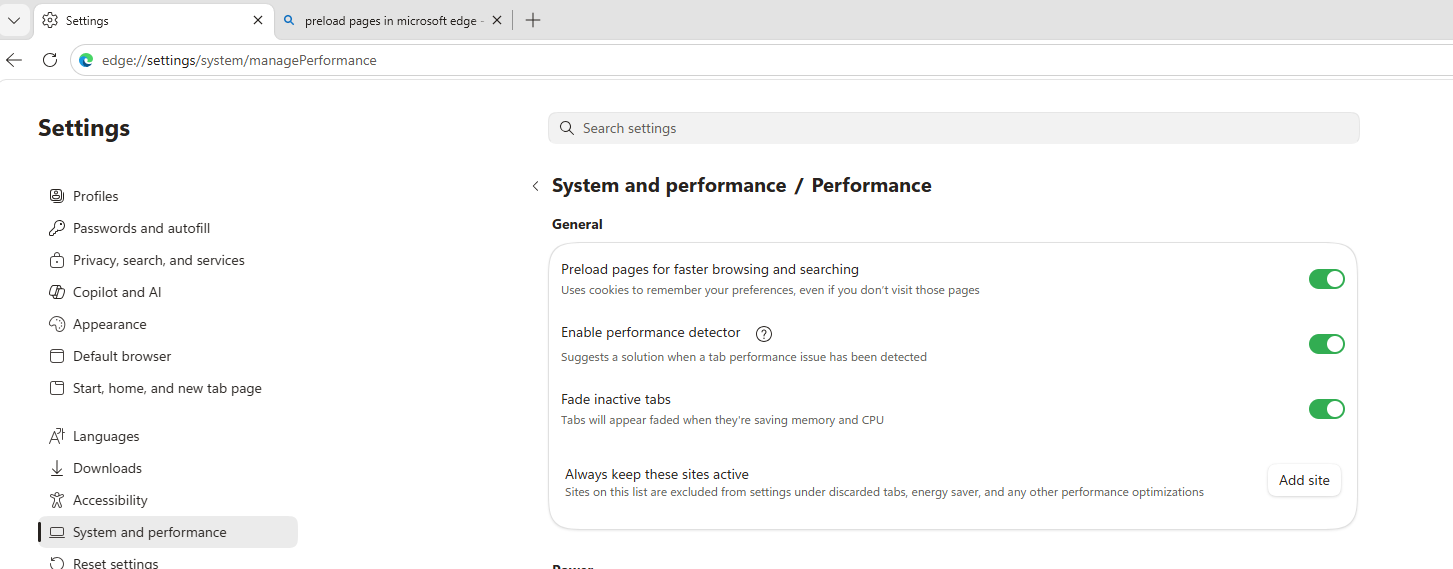
Open Microsoft Edge
Type the following in the address bar:
edge://settings/system/managePerformanceIn general, preload pages for faster browsing are enabled.
4-Use Content Delivery Network (CDN)
A CDN is a network of servers that deliver web content based on their geographical location. CDN speeds the load time of a site as it minimizes network latency for accessing data hosted on remote servers.
There are many CDNs such as Cloudflare & Akamai which have their own DNS infrastructure to speed up the domain name resolution process. CDN decreases ping times as well; that’s why DNS works fast, and a CDN's anycast network can also lower DNS resolution time alongside faster content delivery.
Various companies, like Cloudflare, provide their own CDN services for quick DNS resolution time and content delivery speed.
How does CDN work?
Whenever anyone attempts to open any website, it initially goes for the closest CDN server. The cached content is delivered. The main server only replies to uncached data. This way pages load faster with reduced bandwidth.
How to use a CDN server?
Sign up with a CDN provider such as Cloudflare, Fastly, or Akamai
Point your domain's nameservers to the CDN (update them at your registrar)
Configure caching rules and enable the CDN's anycast DNS in its dashboard
Verify your site resolves through the CDN and test load times
5- Set an Appropriate DNS TTL (Time to Live)
The DNS server holds on to record values over some amount of time, called TTL. DNS servers refresh their records for new DNS queries. A lower TTL means DNS records expire and refresh more frequently. Note this does not speed up lookups - it actually reduces caching and can slow average resolution. Lower TTL mainly helps DNS changes propagate faster; a higher TTL improves caching and repeat-lookup speed.
It also guarantees a quicker propagation time for updates on dns so people are not directed towards old and slower services. The optimal TTL value is between 300 and 600 seconds (5-10 mins).
TTL Value (Seconds)
Time Duration
Common Usage
300
5 Minutes
Frequently updated DNS records, testing changes
600
10 Minutes
Small websites, moderate DNS updates
3600
1 Hour
Standard website DNS caching
14400
4 Hours
Stable business websites and servers
86400
24 Hours
Rarely changed DNS records for maximum caching efficiency
Change TTL value in Windows/Linux/MAC
For stable records, use a higher TTL like 3600 or 14400. For records you may change soon, keep TTL lower, such as 300 or 600.
A high TTL value shows, DNS addresses will remain in for a longer time but it will remain in older versions, no changes will be visible to users. So an optimum time is good to keep DNS performance good.
DNS TTL is usually changed where your domain’s DNS records are hosted, not inside Windows, Linux, or macOS. Increase TTL in DNS Hosting Panel
Use this for any OS:
Log in to your DNS provider or domain registrar.
Examples: Cloudflare, GoDaddy, Namecheap, cPanel, Route 53, Websoul, etc.
Open your domain’s DNS Management or DNS Zone Editor.
Select the DNS record you want to update.
Example records:
A, AAAA, CNAME, MX, TXT
Find the TTL field.
Increase the TTL value, Save the record.
Wait for DNS caches to update.
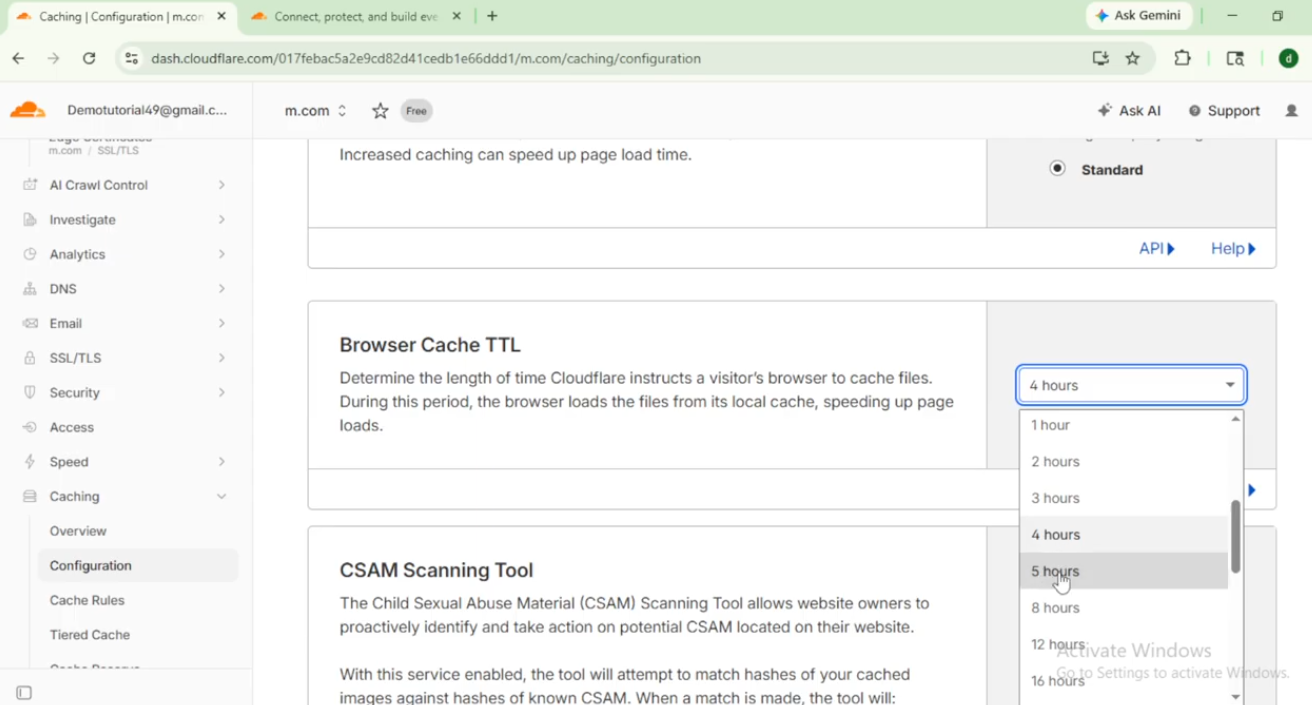
Verify TTL Changes in windows
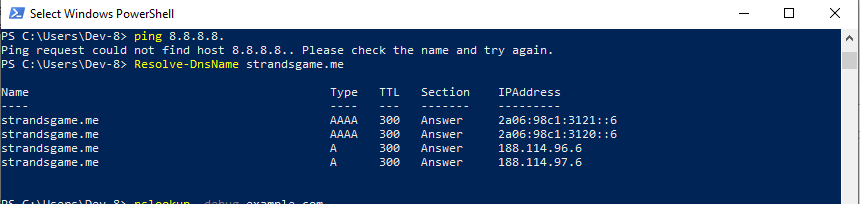
To check TTL on Windows:
Resolve-DnsName example.com
Or
nslookup -debug example.com
Verify TTL value in MAC
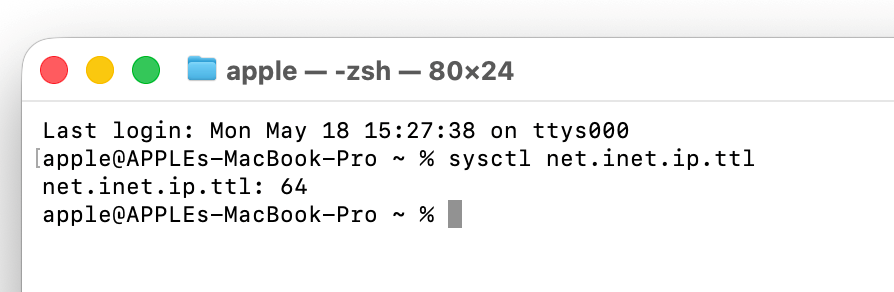
Use dig to read a record's cached TTL: dig +nocmd example.com +noall +answer
The number shown before the record type (for example 300) is the cached TTL in seconds
Verify TTL value in Linux
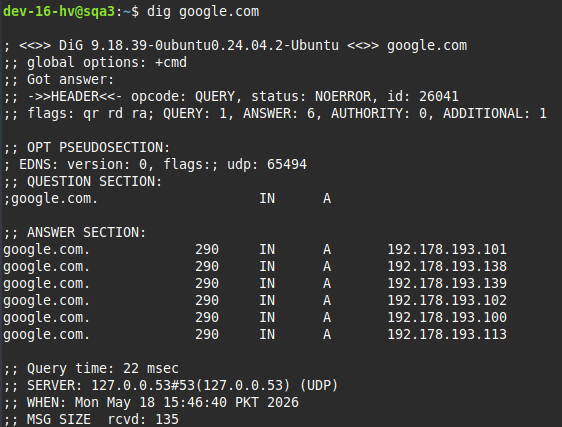
You can use command
dig google.com or
dig google.com +nocmd +noall +answer
Here in this example TTL=290
6- Avoid DNS Chain Lookups
DNS chaining is about redirecting DNS queries multiple times from one CNAME record to another, and at the end leads to an A record. Each additional redirect increases DNS Lookup time.
Point your domain directly to an A record that resolves to an IP address. This process reduces the number of lookups.
To check for addition redirects
Windows
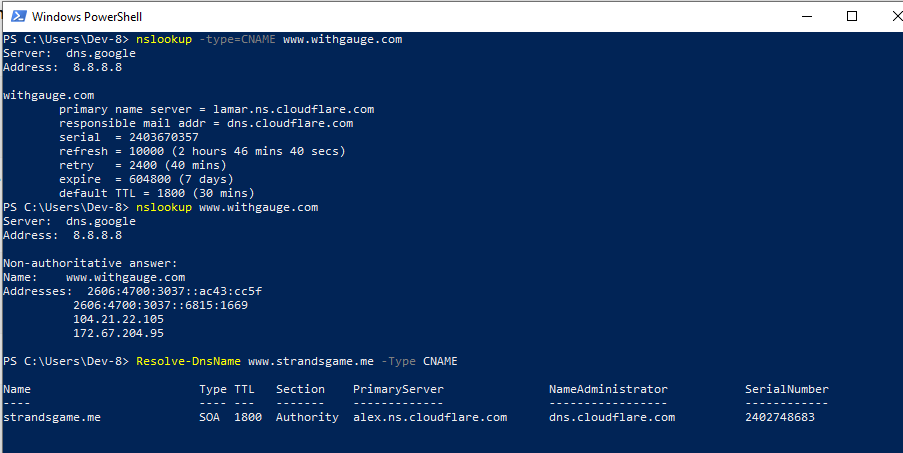
nslookup yourdomain.com ( for DNS chain Lookup)
nslookup -type=CNAME yourdomain.com (full DNS path)
Resolve-DnsName yourdomain.com ( detailed response timing) (best command)
Linux
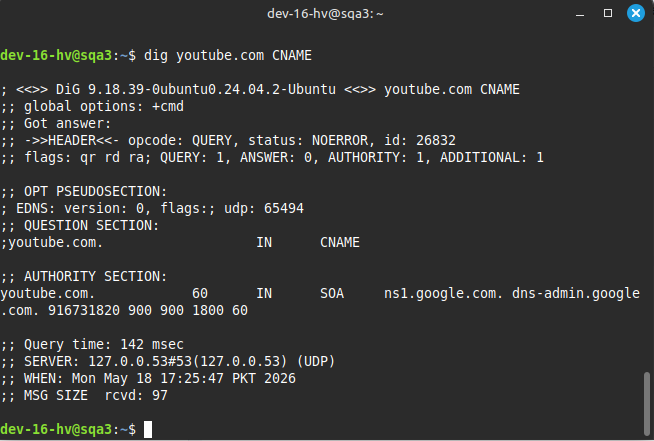
dig yourdomain.com
dig yourdomain.com CNAME (best command)
dig +trace yourdomain.com
Mac
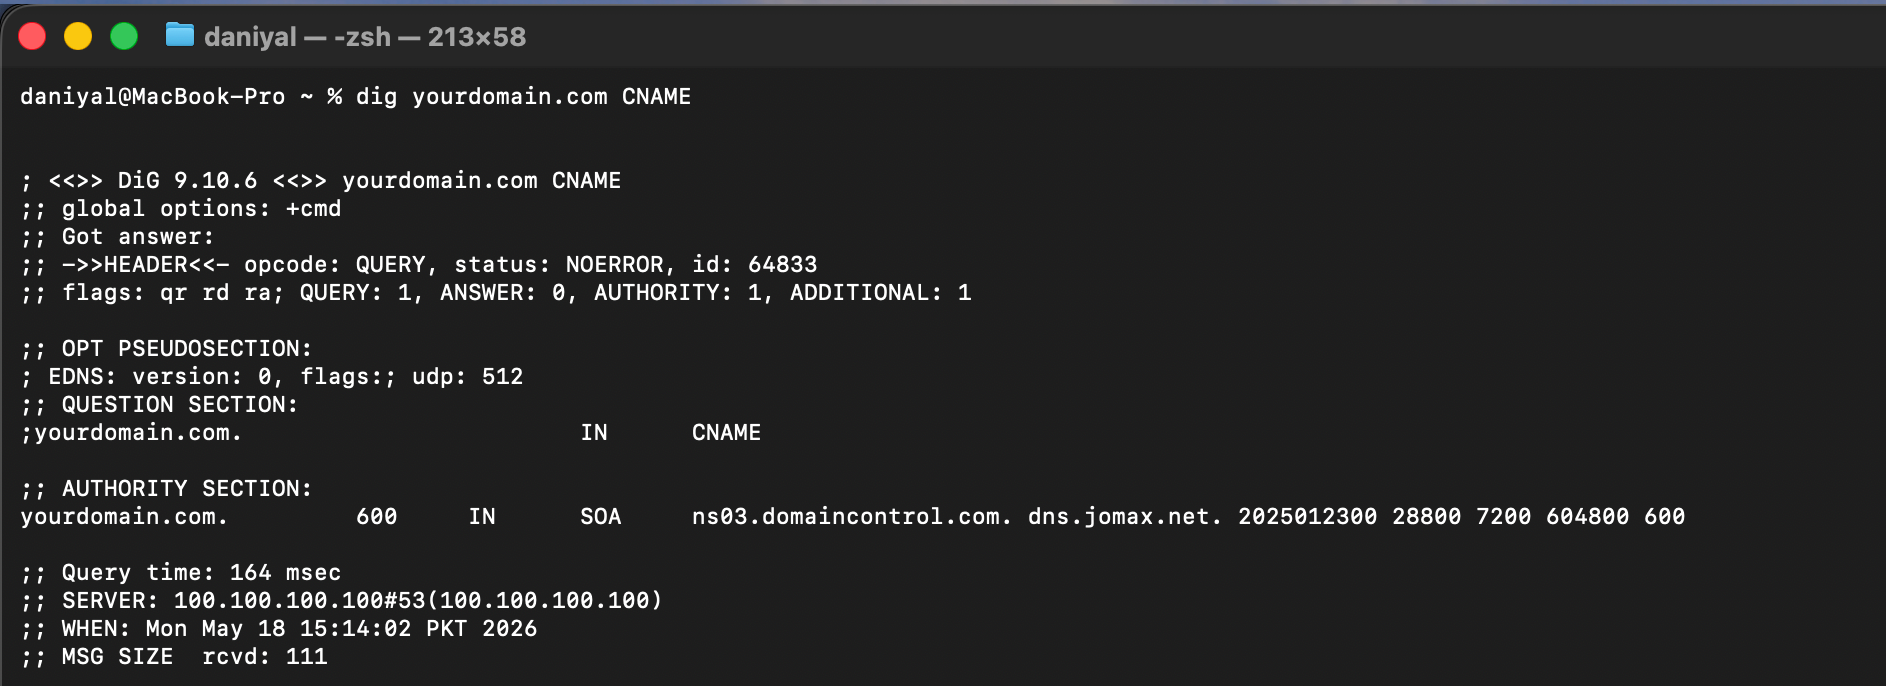
dig yourdomain.com CNAME (best)
or
dig +trace yourdomain.com
7- Test the Website DNS server performance
A website hosting provider also uses a nameserver, which could be slow or unreliable. This increases DNS lookup time. Use PowerShell commands or another online tool to check the DNS performance of the hosting provider.
Our DNS speed test tool has various built-in host provider names, like Cloudflare or Google. You can check their DNS speed. Choose the fastest one to overcome the latency rate of the website.
Windows:
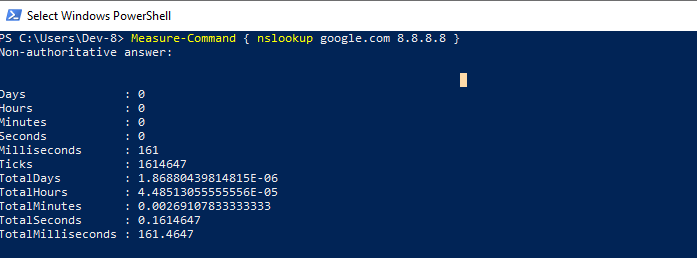
Measure-Command { nslookup google.com 8.8.8.8 } (for particular dns query time finding at your system)
Resolve-DnsName google.com -Server 1.1.1.1 ( testing for public cloudflare server)
Linux:
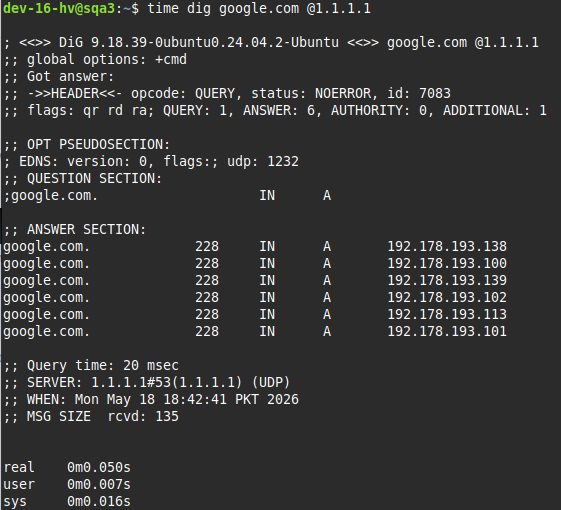
time dig google.com @1.1.1.1
nslookup google.com 8.8.8.8
Mac:
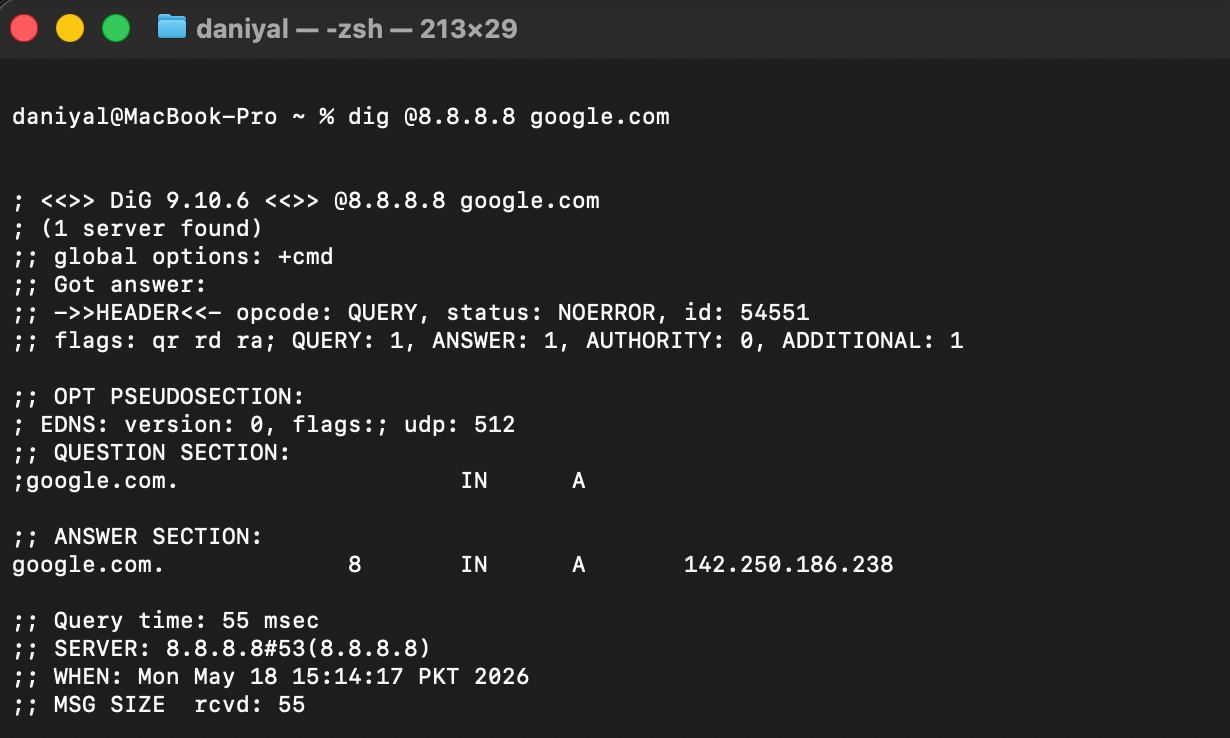
dig @8.8.8.8 google.com (for particular server, see query time)
8- Enable HTTP/3 (Speeds Connections, Not DNS Itself)
Note: HTTP/3 does not change DNS lookup time, but it speeds up the connection that follows a lookup, so it complements your DNS fixes. HTTP/3 is a modern communication protocol offered by many website hosting services today. Unlike older protocols, HTTP/3 is built on QUIC, which reduces connection setup time and handles network changes more efficiently.
It means faster first connection times, loading speeds of pages, as well as better user experiences for website visitors. Try to buy hosting from a well known company which also provides this protocol.
9- Regularly check DNS performance
DNS issues often arise and go unnoticed. That, in turn, lowers website performance. Track DNS response time as part of a routine. Identify slowdowns and slow DNS response time.
Make sure your DNS server changes are working properly across the internet, especially after updating your DNS records.
Key Takeaway
A good DNS nameserver is necessary for a fast-loading website. A primary cause of slow web page load times is long DNS resolution times.
Good DNS resolution times are between 50 and 120 ms
Fix slow DNS resolution time by:
Use a fast and Reliable DNS provider
Remove unnecessary or outdated DNS records
Enable DNS caching for faster repeated lookups
Use CDN to reduce latency and speed delivery
Lower TTL for quicker DNS updates and refresh
Avoid DNS chains and unnecessary CNAME redirects
Use fast, optimized nameservers for better performance
Enable HTTP/3 for faster connections
Monitor for problems with your dns servers, then deal immediately.
Some simple dns optimizations techniques that can greatly increase your pagespeed for every website out there. It also improves the user's online browsing performance quickly.